
Cut a piece of cardboard to a triangle shape for the base of the tree. Round the cardboard each size to give it some shape rather than having it flat.
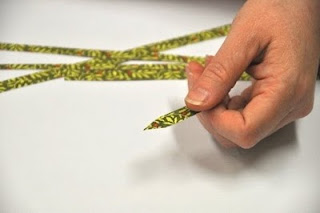
Cut strips of paper 8-9mm wide and cut into rectangles about an inch long. You will need thinner strips of paper 5mm and an inch long. The larger ones will be for the bottom of the tree and the thinner ones at the top. Each of the pieces need to have one end cut to a point, as shown above.
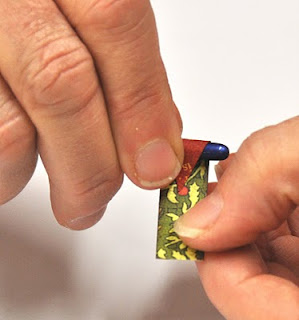
Use a paint brush and wrap the pointed end around the brush to make the pointed end curl. If you have trouble then you can spray the pieces with water to make it easier.
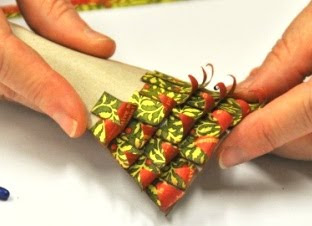
Start at the bottom on the tree and glue one piece on at a time. You can overlap each piece if you need to. Use the wider pieces first. When you start the second row glue them down over the top of the bottom row above the curling bit. You can have the rows as close or as spread out as you like.
 Keep adding rows of curled pieces. As you work your way up the tree, you can use thinner pieces. Remember you can overlap the pieces on each row to help make them fit.
 Add glitter to each curl or crystals. You can decorate your tree as you wish. Try some white embossing powder for snow.
 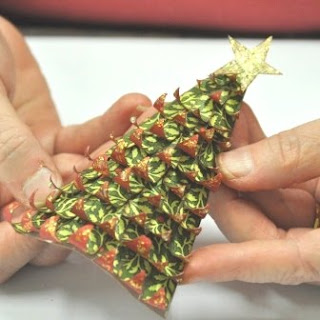 When finished shape the tree again, as you have been gluing the pieces on your tree you will have flattened it. Cut a pot shape out of cardboard and tuck it under your tree, when you add it to a page. This tree would work if you wanted to make a completely round one. You would need to make a cone and add the papers all the way around. I will be making one like this for a Tim Holtz configurations box that I am working on. Will post photos during the holidays.
Have a go and let me know how you get on.
thanks for looking
Jane
PS only 55 sleeps to go!
That tutorial was great Jane. Thank you for sharing, I'm going to make one tomorrow, love it. Cheers.xx
ReplyDelete